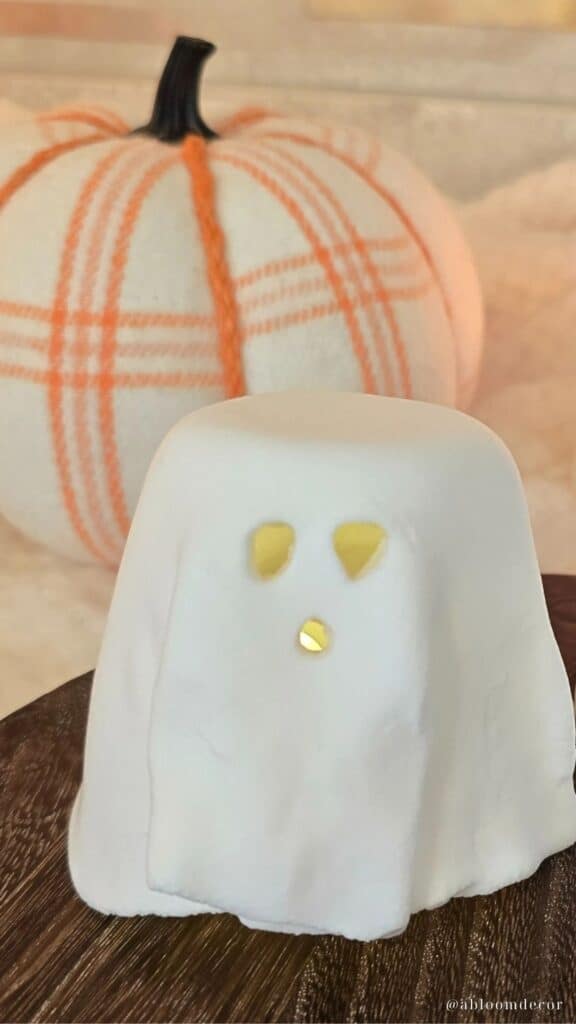
Spooky-Cute Halloween DIY Clay Ghost
This post is all about how I made these spooky-cute Halloween clay ghosts!
Halloween decorating has always been one of my favorite parts of fall. This year, I wanted something spooky and cute to add to my shelves and tables.
Have you ever wondered what your home decor style is?
That’s when I decided to make this little clay ghost, which turned out even cuter than I imagined! In this post, I’m sharing how I made it so you can add one (or a few!) to your own Halloween decor.
You can save any of these images to your Pinterest account using the Pinterest share buttons on this page to easily find them again later.
DIY Clay Ghost
Let’s jump into how to make the adorable ghosts. First we’ll gather materials, do a little prep work, and then go through the full tutorial.
Gather Materials

Gather the following materials to complete this project:
- Air-dry clay
- Tea light
- Rolling pin
- Aluminum foil
- Small cup
- Straw or chopstick
Prep
The only prep you’ll need to do for this simple DIY project is gather your materials, and then wrap the small cup in aluminum foil, as shown below:

How To Make DIY Ghosts

Here’s a step-by-step tutorial on how to make a clay ghost:
Step 1: Form a ball

The first step to making these cute ghosts is to roll about 20g of air-dry clay into a ball.
Step 2: Roll flat

Next, grab a rolling pin and roll the ball of clay into a flat circle. Try to get as close to a circle as possible.
Roll the clay out on a smooth, non-porous surface so that it doesn’t stick to the table. I used my quartz countertop, and it worked perfectly.
Step 3: Place over cup

Take the clay and place it on top of the foil-covered cop. Gently press the sides down and pinch small folds around the cup. This creates a sort of billowing effect on the ghost.
If you don’t get it quite right, don’t worry. Just re-roll out the clay and try again!
Step 4: Make the face

For the next step, use a chopstick or straw to create two eyes and a nose. The holes can be as small or large as you want. The larger the holes, the more light will shine through.
Once you do this, let the clay dry completely. I waited about 6 hours.
Step 5: Remove ghost

Once the clay is completely dry, gently remove it from the cup.
Step 6: Light it up

Grab a tea light and turn it on! Flickering tea lights always look the best.
Step 7: Place under the ghost

The last step is to place your cute ghost over the tea light. And that’s it, you have a super cute clay ghost!
How to Style Clay Ghosts
Once you’ve made your clay ghosts, the real fun begins—styling them around your home! I love using them in little clusters on shelves, mantels, or coffee tables because they look so sweet when grouped together.
You can mix them with mini pumpkins, candles, or fall garlands for a cozy layered look. If you’re decorating a tiered tray, a tiny clay ghost is the perfect size to tuck in alongside other seasonal pieces.
You could even line up a few ghosts as a simple centerpiece on your dining table or entryway console. However you style them, these little clay ghosts add the perfect mix of spooky and cozy to your Halloween decorating.
Conclusion
This Halloween DIY clay ghost is such an easy project that adds so much charm to your seasonal decorating.
Whether you make one or a whole ghost family, they’ll bring a playful and cozy feel to your home. I love how simple materials can come together to create something so festive.
I hope you enjoy making your own ghost and that it brings a little extra Halloween cheer to your space this year.
PIN IT TO REMEMBER IT
Don’t forget to pin this so you can refer back to it later!

Before buying furniture, get this free checklist!
The measurements, sizing rules, and 10 must-ask questions that save you from returns, regrets, and wasted money.